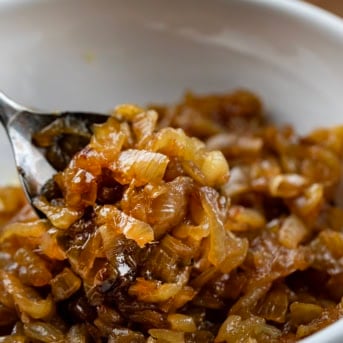
These caramelized onions are soft, sweet, savory, and packed with deep, rich flavor. Slow-cooked until golden brown and jammy, they add an irresistible boost to everything from mashed potatoes (like my French onion mashed potatoes) and burgers to sandwiches, dips, and more. The secret is cooking them low and slow, letting the natural sugars in the onions develop that signature sweet-savory caramelized flavor we all love. They are perfect for adding a touch of French onion flavor to your favorite recipes! Give this recipe a try when you make my Caramelized Onion Roast Beef Rolls!

Ingredients & Substitutions
- Yellow Onions: Yellow onions are the classic choice for caramelized onions thanks to their perfect balance of sweetness and savory flavor. Sweet onions (like Vidalia) will give you a milder, sweeter result. Or, use red or white onions for a stronger, more robust flavor.
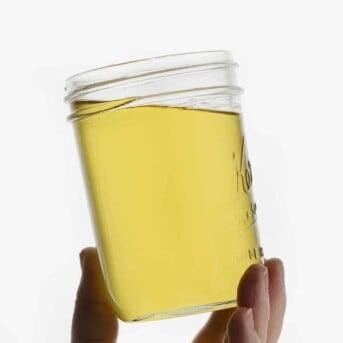
- Extra Virgin Olive Oil: The olive oil adds richness and helps the onions cook evenly without sticking. If you don’t have olive oil, any neutral oil like canola or vegetable oil works in a pinch. Or, use more butter for extra flavor.
- Unsalted Butter: Butter (I prefer unsalted butter) gives the onions a rich, buttery flavor that deepens as they cook. You could use all olive oil if you prefer.
- Salt: Salt helps draw out moisture from the onions and enhances their natural sweetness. Sea salt or table salt would work, too. (Just reduce the amount slightly if using table salt, since it’s finer.)
- Water or Broth: A splash of water or broth helps loosen up the flavorful browned bits on the bottom of the pan. For a little extra depth of flavor, try using white wine.

What Are the Best Onions To Use?
For me, yellow onions are the best for caramelizing. They are affordable, easy to find, and develop the perfect sweet-savory balance after slow cooking until soft and golden. If you want extra sweetness, Vidalias or other sweet onions caramelize nicely and cook a bit faster. Red or white onions work too, but have a sharper flavor and aren’t as sweet. Whatever you pick, remember: low and slow is the secret to perfect caramelized onions!
Can You Make Caramelized Onions Ahead of Time?
Yes! Caramelized onions are fantastic for making ahead because their flavor actually improves after resting. You can cook them fully, then let them cool and store them in an airtight container in the refrigerator for up to 5 days. When ready to use them, gently reheat on the stove over low heat or in the microwave until warmed through.

Troubleshooting Caramelized Onions: Common Problems & Fixes
Why are my onions burning?
If your onions are burning or sticking, your heat is too high. Lower it to medium-low or low. Add a splash of water or broth to deglaze the pan and scrape up browned bits. Stir less often to allow even browning without burning.
Why aren’t my onions browning or caramelizing?
If onions aren’t turning brown, your pan may be too cool or overcrowded. Start on medium heat to warm the pan, then reduce to medium-low for slow cooking. Avoid overcrowding; too many onions cause steaming, not caramelization.
Why do caramelized onions take so long to cook?
Caramelizing onions is a slow process, usually 50–60 minutes or more! Use a wide skillet to spread onions out for better even browning. Patience is key!
How do I fix watery caramelized onions?
Start by sprinkling kosher salt to draw out moisture. If onions are still watery, continue cooking uncovered to let excess liquid evaporate.

How to Store Caramelized Onions
To keep your caramelized onions fresh and flavorful, let them cool completely after cooking. Then, transfer them to an airtight container and store in the refrigerator for up to 5 days.
Can I Freeze Caramelized Onions?
Yes, you absolutely can freeze caramelized onions! I love to keep a batch on hand for months, saving me time in the kitchen! To freeze, let the onions cool completely, then portion them into airtight freezer-safe containers or resealable bags. Make sure to remove as much air as possible before sealing. Frozen caramelized onions will keep well for up to 3 months. When ready to use them, let them thaw overnight in the refrigerator and gently reheat on the stove or in the microwave.
Caramelized Onions
Ingredients
- 3 large yellow onions, (about 2 pounds total), sliced into half moons
- 2 tablespoons extra virgin olive oil
- 1 tablespoon unsalted butter
- ½ teaspoon kosher salt
- 1-2 tablespoons water or broth, for deglazing
Instructions
- To a large skillet over medium heat, add the olive oil and butter. Once the oil is shimmering and the butter is melted, stir to combine.
- Add the sliced onions and toss them to coat evenly. Spread them out into an even layer across the skillet.
- Sprinkle the kosher salt over the onions. This helps draw out moisture, which is essential for even caramelization.
- Reduce heat to medium-low. Let the onions cook, stirring them every 5–10 minutes. You want to allow them time to rest against the pan so they brown slowly and evenly.
- After about 20-25 minutes, the onions will soften, shrink, and turn golden. If they start to brown too quickly or stick to the pan, reduce the heat and add a splash of water or broth to deglaze, scraping up any browned bits.
- Continue cooking, stirring occasionally, for 50-70 minutes total. The onions should turn a deep golden brown, become very soft, and almost jammy in texture.
- Use immediately or let cool and refrigerate in an airtight container for up to 5 days. You can also freeze them in portions for longer storage.
Did you make this recipe?
You can tag me at @iamhomesteader.
What the Test Kitchen had to say about this recipe:

Autumn
These are perfectly soft and jammy. I want to put these on everything now, from burgers, sandwiches, you name it!

Elizabeth
I don't know if I could eat these by the spoonful, but they are so flavorful on other foods! I love them!

Stephanie
These may take some time, but it is totally worth it!

Bella
These onions are so sweet and buttery! I kept stealing a few from the pan…

Can you do these onions in a crock pot?
My stove gets to hot even on low cast iron grates hold alot of heat.
That would be a completely different recipe and does require some different timing/methods:
How to “crock-pot caramelize onions”
Thinly slice your onions as the recipe says.
Add them to the crock-pot with a little butter or oil + salt.
Set the crock-pot to LOW and cook for 8-12 hours, stirring once or twice.
If after most of the time there’s still a lot of liquid, remove the lid or prop it open for the last hour or two so the moisture can evaporate and the onions get jammy.
A simple recipe but delivers tons of flavor. I’ve been making these for years. Thank you for putting the recipe on line. It’s been awhile since I made them but will do so now.