This Sourdough Starter is pretty darn easy to do and a great option for delicious homemade baked goods! A sourdough starter doesn’t have to be a chore, and the end result is worth the patience in the beginning. If you like homemade treats try my Sourdough Pretzels!

Sourdough Starter
I have to start out by saying that this is how *I* do a starter. I have watched every expert under the sun and read every book and let me tell you something… they are all different. So I have been testing and testing and retesting and using life experience to determine what works best for me. Well, I finally decided on what worked best for me, and it could not be easier and straight forward. The ingredients are simple: flour and water. And, with just two measurements to remember, the feeding is a piece of cake (or should I say bread😉) as well!

Getting your Sourdough Starter Started
Now if you want to bring science into it, the type of flour and type of water you use are important. They can produce a better product. But I am here to tell you that you can absolutely use all-purpose bleached flour from Dollar General and it will still be ok. Make sure you have the following materials and ingredients on hand:
- Jar & Lid – I prefer glass, you don’t want to use metal or plastic. If you don’t have a lid use a paper towel and rubber band. A good size jar to have on hand for a sourdough starter is a quart (32 ounces) or something close to that capacity.
- Flour – I prefer organic unbleached all-purpose, but also love whole-wheat and bread flour. Or, give rye flour a try.
- Water -Purified is best. Have chlorinated tap water (as most people do)? You can use bottled water or just set the water out uncovered for 24 hours before using it to feed your starter. This allows the chlorine to evaporate so it won’t kill the wild yeast.
That’s it for supplies! Now, let’s get to making the starter.

How to Make a Sourdough Starter
Remember these amounts: 1/2 cup flour and 1/4-1/3 cup water. These are the only measurements you will need to remember throughout this entire process of creating your sourdough starter. And trust me, you will use those measurements a lot with all the ‘feeding’, going on! After all, the goal is to get those microorganisms to work for that sour and fermented flavor that sourdough is known for.
To begin, add the flour and water to a jar and stir well. Try not to use a metal spoon. After all, Grandma said she always uses the handle of her wooden spoon to stir. Now gently cover the jar (do not seal it closed) and let it sit in a warm place (70°F is best) for 24 hours. The best option for a cover is a paper towel and rubber band. Or, just remember to keep the jar lid loosely sealed. Try to keep it in an area of your house that is somewhat warm. Very cool rooms tend to slow the action of a starter. Wait 24 hours before checking the mixture.

‘Feeding’ the Sourdough Starter
With sourdough starters, you will hear the term ‘feeding’. This is simply adding the flour and water to the mixture to keep the microorganisms working. Remember the measurements I told you to get ingrained in your brain? The 1/2 cup flour and 1/4-1/3 cup water is all you will need throughout the ‘feeding’ process.
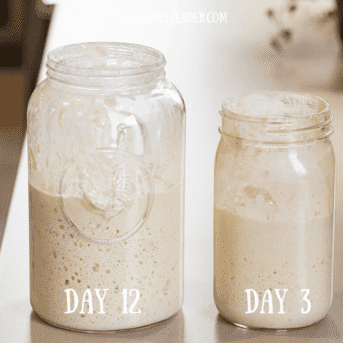
Day 2: After 24 hours, check the mixture for bubbles. If you see bubbles, add the flour and the water, mixing it well, and let it sit for the next 24 hours. If you don’t see bubbles, do not get discouraged! It sometimes takes a couple of days for the science of it all to work. Just wait another day (or even two) until the first feeding.
Day 3: After another 24 hours, check for bubbles. If you do see bubbles, remove half of the starter, add the 1⁄2 cup flour and 1⁄4-1/3 cup water and stir thoroughly. Let sit 24 hours. Oh, and don’t get rid of the starter you removed! I will give you some ideas on how to use this in the end.
For the third feeding, remove half of the starter (but don’t throw it out!), and feed with 1⁄2 cup and 1⁄4 cup water, stirring thoroughly. Let sit 24 hours. (And yes, you can begin a new starter with the discard! Try adding a new kind of four! Or simply use to make crackers or pancakes.)
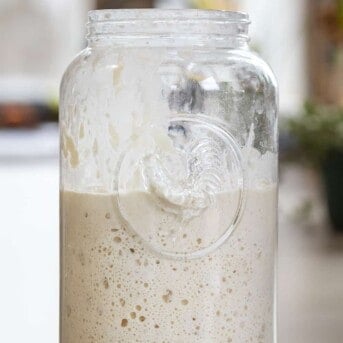
On days 4, 5, 6 you can feed it 2 times a day with those measurements that are sure to be memorized at this point😀. Continue this routine (discarding before feeding) until the starter is consistently bubbling and doubling in size within 8 hours of each feeding.
It is now ready to use for a perfect Sourdough Bread!

How to Store a Sourdough Starter
After all the feeding and you know you have a strong, active starter, you can store the starter in the refrigerator and feed it about once per week. When you plan to use the starter, pull it out of the refrigerator 24 hours in advance to feed it and allow it to warm up and grow.
These starters get better with age, so don’t think you have to use it right away! Sourdough starters are hearty, so they last quite a while. But, like all living things, it can get ‘sick’ or go bad. If it turns pink, red, moldy, or gets a really putrid smell, throw it out. After all, you now know how to start again!
What Flours Can You Use in a Sourdough Starter?
All grain-based flours will work beautifully in a starter. A few examples are:
- Rye
- Bread Flour
- Rice
- Whole Wheat
- Einkorn
Truesourdough.com has a great comprehensive guide to flours.
Vanilla and Bean has a great guide to Gluten-Free sourdough starter.
What to do with the Discard?
As I said, don’t throw out the sourdough starter that you remove each feeding time to make room for the starter to rise. Just make sure your sourdough starter is room temperature (about 70°F) before using it in baking. Here are some ideas on how to use (and enjoy) the excess sourdough starter.
- Sourdough Bread (not until day 6 or 7)
- Sourdough Pancakes (seriously SO GOOD!)
- Sourdough English Muffins
- Sourdough Brownies
- Sourdough Pretzels
- Cinnamon Rolls (the best!)
- Banana Bread
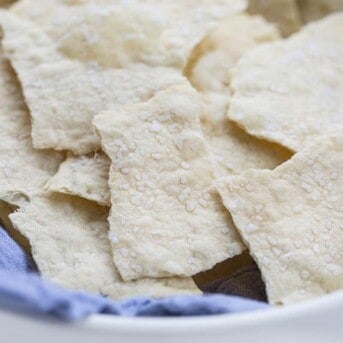
- Sourdough Crackers (like saltines)
- Sourdough Chocolate Chip Cookies
- Sourdough Pasta Noodles
As I mentioned, this is how *I* make a starter. King Arthur recommends 1 cup flour and 1/2 cup water and they suggest you weigh ingredients with a scale. (This is the same equivalent that I use, just doubled.) Pro Home Cooks has a great free downloadable Sourdough guide for those who really want to understand the science behind it.

Here is the recipe for Simple Sourdough Bread!
More Sourdough Recipes


Sourdough Starter
Ingredients
- ½ cup flour, whole wheat or unbleached all-purpose
- ¼-⅓ cup water*, 75°F is ideal
- 1 glass jar, or bowl (about 32 ounces)
- 1 paper towel
- 1 rubber band
Instructions
TO BEGIN
- Start the process by adding ½ cup whole wheat flour and ¼ cup water to the jar. (If you need more flour to reach a pancake batter consistency, you can add up to ¼ cup more.) After letting it rest for 30 minutes, stir the mix with a wooden spoon. Set aside until the first feeding.
THE FIRST FEEDING
- Stir thoroughly and cover with a towel and rubber band. Let sit for 24 hours at room temperature. (Try to keep it in an area of your house that is somewhat warm. Very cool rooms tend to slow the action of a starter.)
- After 24 hours, check the mixture for bubbles. If you see some, add ½ cup all-purpose flour and ¼-⅓cup water. If you don’t see bubbles, give it a stir and let sit 24 more hours.
THE SECOND FEEDING
- Check for bubbles again. If you do see bubbles, remove half of the starter, add ½ cup all-purpose flour and ¼-⅓ cup water and stir thoroughly. Let sit 24 hours.
THE THIRD FEEDING
- Remove half of the starter, and feed with ½ cup all-purpose flour and ¼ cup water, stirring thoroughly. Let sit 24 hours.
ADDITIONAL FEEDINGS
- On days 4, 5, 6 you can feed it 2 times a day, if you want and plan on using it.
- Continue this routine until the starter is consistently bubbling and doubling in size within 8 hours of each feeding.
- From this point (or even on day 5), you can store the starter in the refrigerator and feed it about once per week. When you plan to use the starter, pull it out of the refrigerator 24 hours in advance to feed it and allow it to warm up and grow.
Video
Notes
Did you make this recipe?
You can tag me at @iamhomesteader.
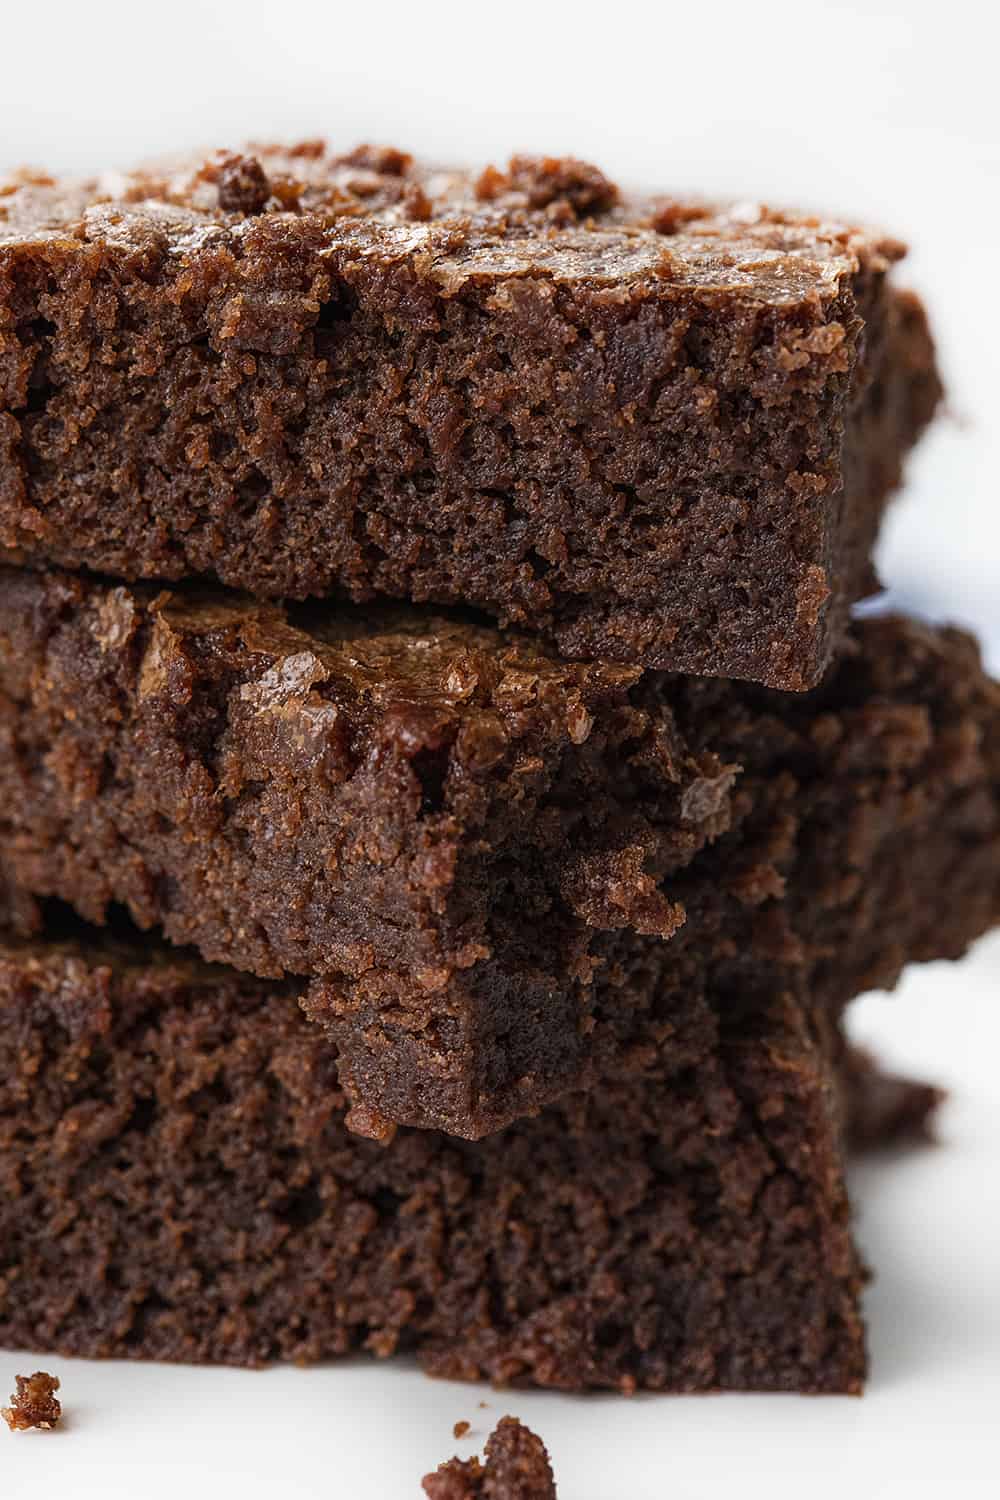
I used this starter to make seriously decadent Chocolate Sourdough Brownies!


What are the ingredients I add to starter for my bread?
https://iambaker.net/simple-sourdough-bread/
First time trying this sourdough starter. What should I do with the discard while I’m waiting for the starter to be ready? Should it be refrigerated? Thanks.
While your starter is getting established, you can either discard it or save the discard for recipes later. I like to keep mine in a jar in the refrigerator until I have enough to use in pancakes, crackers, waffles, biscuits, muffins, etc. However, during the first few days of a brand-new starter, I usually don’t bake with the discard yet since the flavor and fermentation aren’t fully developed.
-Yes, refrigerate the discard if you are saving it.
-Use a separate container for discard.
-If you aren’t going to use it within about a week, you can freeze it.
Help! I think my starter is too watery as there is water separation at the bottom of my jar. What do I do!? 😩
Don’t panic… that usually just means your starter is hungry or a little overhydrated. 😊
First, stir it really well. Then at your next feeding:
discard as usual
add a little less water than normal
aim for a thick pancake batter consistency (not runny)
And just to reassure you: liquid separation is very common with sourdough starters, especially in warmer kitchens or if the starter is ready to be fed again. ❤️
By the end of day two my started was bubbling and doubling. This is a great recipe with great instructions.
Thank you for this!!
Hi Amanda. This is my first time trying sourdough. Mine looks bubbly but not rising. I did not feed it twice a day on days 4-6 because I didnt know what to make with all the discard. I made the sourdough brownies and they were delicious. My brother, mom and boyfriend enjoyed them too. Do you think its not rising because its too new, not warm enough in my house (its 65 degrees) or because I didnt feed it twice a day, or something else? Thank you.
Hi Kim!
First of all… those brownies are a very good use of discard, so you’re already winning. 😊
A bubbly starter that isn’t rising much usually comes down to a couple of things, and you actually named all the likely culprits:
• Temperature- 65°F is pretty cool for a starter. They really thrive closer to 70-75°F (even a bit warmer). At 65°, everything just slows way down, especially the rise.
• Feeding schedule- skipping the twice-a-day feeds during days 4–6 can delay things a bit, but it won’t ruin your starter. It just needs a little more time to catch up.
• New starter- if this is your first go, it may simply not be mature enough yet. Bubbling is a great sign, but strength (rise) comes a little later.
What I would do:
Keep feeding it consistently (once or twice a day), try to move it somewhere slightly warmer if you can, and give it a few more days. You’re looking for it to double in size within 4-6 hours after feeding… that’s when it’s ready!
You’re honestly really close! Bubbles mean it’s alive and active… now it just needs to build strength.
And keep making brownies while you wait… that’s just good planning.
How much of the starter do I use to make a loaf of bread?
https://iambaker.net/simple-sourdough-bread/
My started has raised very little and it separates. Does get bubbles. This is my first attempt so not sure if it’s correct or not
I’m very pleased with this recipe! One question: when I’m going to put my starter in the fridge for awhile do I let it rise first? Or just feed, stir and refrigerate immediately.
Thanks for the kind words on the sourdough starter!
When refrigerating: Feed it (discard half, add flour + water, stir well), then pop it straight into the fridge, no need to let it rise first.
Feed weekly to keep it going. When ready to bake, take it out a day ahead and feed at room temp to activate.
Simple and low-maintenance, enjoy the process!
On days 4-6 and when i only feed it once a week, do i still need to discard half of the starter each time?
Hey Havyn! (Great name!) Yep, keep discarding about half every time you feed, no skipping it. On days 4-6, do it twice a day before adding the flour and water. Once it’s super bubbly and doubling in around 8 hours, pop it in the fridge and just feed once a week the same way: discard then feed. It keeps things fresh and from getting too big or sour. Save the discard for pancakes or crackers!
Okay:) thank you so much!!
I was taught by many different people and read many blogs that you should absolutely not keep the discard for the first 10 to 14 days as the bubbles are from the gasses given off by the bad bacteria that the yeast is competing against. You’re suppose to wait until the yeast outnumbers the bad bacteria. I mean to each their own but I wouldn’t chance using new starter discard.
It’s not quite that simple 😊 Early starter isn’t fully developed yet, but it’s not “bad” either. Once it smells pleasantly sour and looks normal, the discard is great to use in baked recipes.
Wait a second the directions never say to discard I am on day 2 and didnt discard…. should I be if so how??
Great question and you’re totally fine 😊 On days 1 and 2, the recipe does not have you discard yet, so you didn’t miss anything. The first discard happens on Day 3, when you remove half of the starter before feeding it again.
Discarding helps keep the starter balanced and prevents it from growing too large while the yeast is developing. For now, just keep following the day-by-day instructions as written and you’ll be right on track.
Thank you!! My starter is on day 4 and already doubled is that a good sign?? Sorry brand new to this whole thing
So you need whole wheat flour to start? I don’t have any of that on hand is it crucial ? I’ll get some but I was hoping to start right now
Here is what it says:
“½ cup flour, whole wheat or unbleached all-purpose” so you are welcome to start with your unbleached all-purpose
Im soooo happy with this recipe!! My daughter sent it to me cuz I was on day 15 with “my” starter and it never rose. It bubbled but never rose. So I started a new one ( this recipe ), and I cant believe it has rising by 1/2 at least every day and im on day 6, if it rises again tonight( Friday), im going to start the process( tomorrow, Saturday ) to prep for baking on Sunday!.. im so excited. This will🤞be my very first loaf of Sour Dough Bread. The starter has a VERY fresh, slightly sour smell. Ty so much for this recipe. Although I think I did exactly the same with my first starter ( RIP “Uni” ), it failed.. I think.
my jar keeps getting moldy on the sides every time. This is my third time restarting. How to prevent this??
Hi there!
Mold usually shows up when old bits of starter get stuck on the sides of the jar or when the starter isn’t fed and stirred regularly. Each time you feed, scrape down the sides so the jar is clean, and give it a good stir every day so nothing dries out. Make sure you’re starting with a clean jar and utensils, and keep the starter at normal room temperature, not too warm. With consistent stirring and clean sides, mold shouldn’t develop.
You’ve got this!
I have two friends who make sourdough bread, and I have been wanting to try it. Thank you so much for the recipe and video. I am going to try it, and meet one of my 2025 goals!
Wow! I have been so scared of this process for sourdough starter!!! But after reading your directions I am inspired to try today. Thank you so much. Will keep you posted with my results…fail or success.
I followed the direction and everything smells and look exactly as it should. I even baked a few loaves, all came out great as in texture…crunchy outside soft and chewy inside. But no sourness taste:(
My starter is most two weeks old and has been bubbly and smells very sour, I even added rye flour to help with the sourness. It’s been 3 days feeding with rye flour, and yet my bread is still not sour. What am I doing wrong? How can I achieve sourness in my dough? (All my dough I even bulk fermented in the fridge, yet no sour taste)
Hi there!
It sounds like you’re doing a lot right… a bubbly starter and great loaf texture are big wins. The lack of sourness usually just means your starter is still very young. Even if it smells sour, true tangy flavor in bread usually develops once a starter is 4-8 weeks old.
A few tips if you want more sour flavor:
Try a longer cold proof in the fridge (overnight works great).
Use a little more starter in your dough.
Let your starter get slightly less frequent feedings… this encourages acidity.
Keep going with rye if you like, but sourness comes mostly from time + fermentation, not the flour itself.
Nothing is wrong!, your starter just needs more maturity and slower fermentation to build that classic sour flavor.
Hope that helps!
I’m trying my hand at sourdough again after being discouraged last year. I found your page and this has been so helpful and less intimidating after reading. Saved it as a reference to go back to over and over. You did a really great job explaining in a simple way. Thanks
Trying this again after a few past starters failed. I bake lots of homemade yeast breads but have struggled with sour dough. Once we get to weekly feeding, how much do we discard and then add? Do I discard half then do a 1:1 ratio for feeding so that I make sure to keep enough for baking?
I did 60 g starter, 60 g water and 60 g flour.
It rose, is bubbly and smell great but there is not enough starter to make the bread. When I put the starter on the scale, it says 653 (no decimal pt). I’m taring the starter flour and water. Ho do I increase my starter? I’m confused because I don’t know how much starter is in the jar to know how to increase it.
Thanks for any help!
It sounds like your starter is doing exactly what it should… bubbly and smelling great is perfect! Don’t worry too much about the number on the scale, it’s just showing you the total weight of everything in the jar. To increase the amount of starter, you just keep feeding it with equal parts starter, flour, and water.
For example: if you have about 60g of starter in your jar, you can feed it 60g water + 60g flour. Next feeding, if you want even more, take 100g starter and feed with 100g water + 100g flour – now you’ve got 300g. You can build it up as much as you need for your bake.
The key is just keeping the ratio 1:1:1 (starter:water:flour). That way you’ll always have enough for baking and still some left to keep your starter alive!
Great idea for making bread crusty….. But , could you please tell what recipe does adding the 3 ice cubes to baking process refer to.thank you
Ice cubes are placed in the Dutch oven to create steam. That steam keeps the crust softer during the first part of baking, giving your bread time to rise fully and develop a beautifully crisp, open crust and better oven spring. Steam is key to that bakery-style crust, and this is a simple way to get it!
Thank you for replying to everyone Amanda!
Amanda your cooking directions worked perfectly! I did add some changes. After letting the dough sit for an hour plus it became way more stretchy creating bubbles in the surface. I folded again after the 3 hour rise (which didn’t really rise) and then put in fridge overnight.
I heated the Dutch oven as you said. I dropped 3 ice cubes in bottom and cooked as you directed. Perfect!!! Now the hard part…waiting for it to cool…. Thankyou Amanda. I wish you could see it and smell it!
On Day 3, I forgot to discard half the starter before feeding it. What should I do?
Hi there! No worries—missing one discard doesn’t ruin your sourdough starter at all. On Day 3 if you forgot to discard before feeding, here’s what to do:
Just resume as normal at your next feeding.
Before the next feed, discard down to the usual amount (about half, or whatever your instructions say) and then feed with the normal flour and water ratio.
It might look a little extra bubbly or have more volume because you’ve kept a larger amount, but your starter will even out once you get back to the regular discard‑and‑feed schedule.
You don’t need to throw anything away or start over—just jump back in with the next discard and feeding, and your starter will be fine!