Knowing how to clean up (or clarify) used cooking oil will help you get the most use out of leftover oil after frying, searing, or sauteeing. Use the oil for your next batch of Fried Ravioli or Country Fried Pork!
 used cooking oil will help you get the most use out of leftover oil after frying, searing, or sauteeing. How to Clarify Used Oil, How to Clean Oil After Using, How to Clarify Frying Oil, Easy Method for Cleaning Oil, Reusing Oil, Can You Reuse Oil, clarifying oil, i am homesteader, iamhomesteader")
How to Clean Used Cooking Oil
Have you ever wondered, can I reuse cooking oil? Or how many times have you fried something, had a lot of oil leftover, and not known what to do with it?
It’s not wise to pour it down the drain (bad for the pipes) or add it to compost. So, what do you do with it? You can reuse it! Yep, with this method, you can clarify the oil and use it several more times!
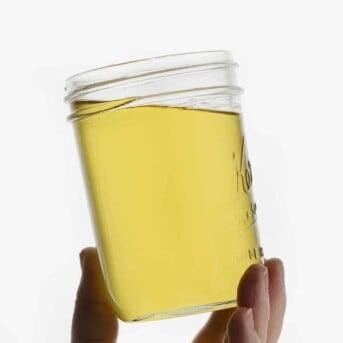
If your oil has ever looked like this⬇️, you are in the right place!
 used cooking oil will help you get the most use out of leftover oil after frying, searing, or sauteeing. How to Clarify Used Oil, How to Clean Oil After Using, How to Clarify Frying Oil, Easy Method for Cleaning Oil, Reusing Oil, Can You Reuse Oil, clarifying oil, i am homesteader, iamhomesteader")
Ingredients
Oil: I tested vegetable oil for this method. I do not recommend other oils with this method, such as olive or avocado.
Slurry: The water and cornstarch slurry will come together when added to the oil to collect all the debris in the used oil.
 used cooking oil will help you get the most use out of leftover oil after frying, searing, or sauteeing. How to Clarify Used Oil, How to Clean Oil After Using, How to Clarify Frying Oil, Easy Method for Cleaning Oil, Reusing Oil, Can You Reuse Oil, clarifying oil, i am homesteader, iamhomesteader")
Recipe Equation
You may notice in the recipe below that it starts with 1 cup of oil, 1/4 cup water, and 1 tablespoon cornstarch. That is the base amount, but you’ll often have more! To use this equation, just measure how much oil you have in cups and then multiply by that number.
For instance, if you have 5 cups of oil, that would equal 1 1/4 cups water and 5 tablespoons cornstarch.
If you have 1 quart of oil (4 cups) it will be 1 cup of water and 4 tablespoons of cornstarch.
 used cooking oil will help you get the most use out of leftover oil after frying, searing, or sauteeing. How to Clarify Used Oil, How to Clean Oil After Using, How to Clarify Frying Oil, Easy Method for Cleaning Oil, Reusing Oil, Can You Reuse Oil, clarifying oil, i am homesteader, iamhomesteader")
What Does the Cornstarch Do?
Are you wondering… just how does this work?
Using a cornstarch slurry when clarifying oil helps collect all the debris from whatever you were frying or cooking in the oil. The slurry will be put into the used oil and heated up until the cornstarch becomes solid. Once you pour the oil and cornstarch through a strainer, the solid cornstarch will be left behind, leaving you will the ready-to-use cooking oil!
Does it Matter What Was Fried in the Oil?
Oil takes on the flavor of whatever you fry in it, so it is a good idea to fry similar items in previously-used oil. Yes, even if it has been clarified with the method I am sharing here. For example, don’t fry donuts in catfish oil.
How to Store Clarified Oil
First off, be sure to label your clarified oil with how many times you have clarified it as well as what you fried in the oil. “1st Clarify, Used for Chicken, 5-21-22” If stored properly, clarified oil can last up to a year.
There are a few storage options for storing used oil. One option is to store it in a sealed container in a cool, dark spot at room temperature. A second option would be to store the oil in the refrigerator. The third option would be to store the oil in the freezer. This will give the oil a longer shelf-life. To use, remove the oil from the freezer and allow it to come to room temperature before using. It should not be cold.
 used cooking oil will help you get the most use out of leftover oil after frying, searing, or sauteeing. How to Clarify Used Oil, How to Clean Oil After Using, How to Clarify Frying Oil, Easy Method for Cleaning Oil, Reusing Oil, Can You Reuse Oil, clarifying oil, i am homesteader, iamhomesteader")
How Long Will Clarified Oil Last?
Although I stated you could reuse the oil up to three times, it does depend on what you are frying or using the oil for. Three reuses are generally the minimum number of times, regardless of what you are frying. However, if the oil ends up with a greasy odor, turns brown, or smokes easily, it’s time to toss it.
Simplest Method For Cleaning Used Oil
If you are short on time and planning on frying a similar recipe in the used oil, you can simply strain it. Just pour the oil over a pot that has a fine strainer and is lined with a few layers of cheesecloth or coffee filters. This gets out the large chunks and burnt bits.
How to Clarify Used Cooking Oil
Ingredients
- 1 cup used cooking oil, cooled
- ¼ cup water
- 1 tablespoon cornstarch
Instructions
- Place a fine-mesh strainer over a heat-safe bowl and set aside.
- In a small dish, whisk together water and cornstarch to create a slurry. Set aside.
- Pour your used cooking oil into a large pot.
- Pour the cornstarch slurry into the pot with the used cooking oil.
- Heat this mixture over low heat. (You don't want it to simmer.) Occasionally, stir and scrape the bottom of the pot. This process takes about 10-12 minutes. You know it is done when the cornstarch has all come together, becomes a solid, and has collected all of the debris.
- Remove oil from heat and pour it into the fine mesh strainer. (You can also use a couple of layers of cheesecloth.)
- Discard the cornstarch mixture.
- Allow the oil to cool completely before storing. The oil will look cloudy at first but will settle as it cools.
- Refrigerate the clarified oil.
Notes
Did you make this recipe?
You can tag me at @iamhomesteader.

Can you do this with peanut oil?
I fry a potato in my strained oil and it takes the previous taste away and makes your oil clear.
great money saving ideas Im single and always looking to save money cooking for one is tough its three pork chops and most meats
Family packs save but good lean cuts on top whilethinner fatty cuts hidden
I’ve purchased heavy duty fabric cone filters used by restaurants to filter their large amounts of used oil. Unlike paper coffee filters, they don’t break down during use and can be cleaned and used repeatedly.
what a great tip but how can I make the used oil that is OK 4 composting? Any ideas?
Im happy with this method and thank you so much. If im using 20l? May I have the measurements please.
20C Oil
5C Water
20tbsp or 1.25 cups
Thank you for this! I just used this method with 3 cups of canola that would have just gone in the trash. It feels like such a waste to throw it away. Also, oil is getting expensive. I just paid over $9 for a large great value brand canola.
Thanks for sharing useful content.
Honestly a coffee filter worked better in conjunction with a strainer by itself and got the oil clearer faster in the end vs this process.
After I did the process and strained through a fine strainer and I passed the oil through a coffee filter and the filter got clogged with something when I tried to filer it with the method outlined. Meaning while the cornstarch was coagulated there was still cornstarch contaminates in the oil. The same oil i did with the coffee filter method passed easily a second time so I knew no contaminates in the oil.
That’s great that you found a method for you, in your kitchen, with the oil you used for a purpose you didn’t define. This method does work if properly followed, and you remove the clump of cornstarch. But again, please do continue to use the method that works best for you, in your kitchen.
I used it to fry chicken, french fries, burritos, corn dogs and anything that can be fried and i’m using vegetable oil. Not saying that the method outlined doesn’t work but there is a better way that doesn’t requier cornstarch or heating the mixture. A funnel if you choose, strainer, pan and coffee filter is all you need. Yours you need Pan, corn starch, funnel if you choose, strainer and a stove or a heat source of some sort. Alot of people have posted the the corn starch method and while it works it a bit cumbersome. Use the strainer to get all the big pieces out then coffee filter it you can do about 3 cups per coffee filter in about 8 min before you have to change the filter. Way more time efficient if you have item to cook. Learned that method from a Certified Chef named Chef Jeff he’s been a Chef for 25yrs and was the personal Chef for Governor Kathleen Sebelius of Kansas.
Again not saying it won’t or doesn’t work just a better faster way. Kinda like you can wash your clothes with a washboard but most use a washer since its faster and easier.
I used to jump to the recipe until I realized what good tips you have. If everyone would read through what you wrote you wouldn’t have to repeat yourself in answering questions. From now on I’m reading what the author wrote. I’ve learned so much!
thanks so much for this, i’m currently trying it now. what happens if it simmers as you put it in low heat, should I just turn the off if ever that happens?
What happens to the water used to make the slurry?
It combines with the cornstarch.
Does this have to be done in a certain time? I strained my oil when it was still a little warm (not hot) and put it in a jar. Can I do this method in the morning or would I need to do it now? I so very don’t want to do it now hahahaha
Awesome ..thank you so much for this. We have wasted so much oil but won’t now..
I am allergic to corn. Do you think arrow root powder would work?
How do you get rid of oil you no longer want to use?
I’ve had good success in straining my cool daddy’s deep fryer’s peanut oil through doubled up cheese cloth. Incredibly clean result!
Wowzers! I just did this in less than 10 minutes and I have CLEAN AND CLEAR OIL! Simple and amazing.
I like it
I would love to know that too, Lucille. Also, if you freeze it, do you bring it to room temperature before heating it? Thanks for the recipe, Amanda!
Sure! If freezing- when you are ready to use, allow it to come to room temperature (it should not be cold!) before using.
Does his work with olive oil, and avacado oil ?
Thanks so much for this tip. It’s a real money saver.
This method is for vegetable oil only.
However, I would not use this method for avocado oil. It can actually be a health hazard.
Oliva oil should only be reused if the temperature does not exceed 400°F. I would recommend sticking to the “simple”, filtering method of just straining through cheesecloth. I have NOT tested olive oil with the heating method. Please do your own research should you be looking to clean olive oil.