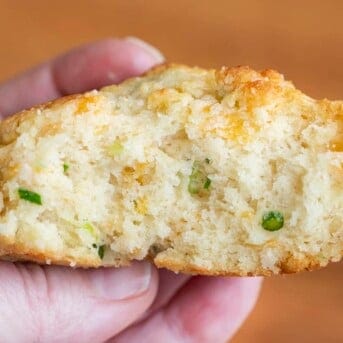
Cheesy Garlic Scapes Biscuits are soft, buttery, and cheesy biscuits that are made with garlic scapes for just the right amount of garlic flavor in each bite. Try my Cheesy Garlic Cruffins and Cheesy Garlic Bread for more cheesy, garlicky bread.

Cheesy Garlic Scapes Biscuits
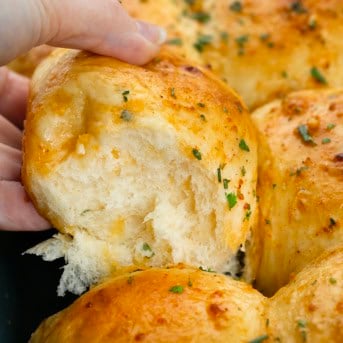
There is nothing better than a pan of homemade biscuits, especially cheesy biscuits! Topped with butter and salt, these biscuits are baked to perfection in a pie pan. The trick to these biscuits is grating the butter and putting it in the freezer until you are ready to use it. I used this same method in my homemade buttermilk biscuits recipe.

What are Garlic Scapes?
Garlic scapes are the curly green stems that grow above ground as the garlic bulbs grow underground. Because they are twisty and curly, they are sometimes referred to as ‘serpent garlic’. Garlic scapes still have a garlicky taste, but not quite as strong as a garlic bulb.
They can be used in any recipe that calls for regular garlic, so go ahead and get ahold of some garlic scapes (usually found at farmer’s markets) when you can! Just cut off the pointy tip before you use them. If you can’t find garlic scapes, you can substitute with half the amount of minced garlic. So, in this recipe, you would use 1 1/2 tablespoons of minced garlic in place of the garlic scapes.

How to Make Cheesy Garlic Scapes Biscuits
To make these biscuits, grate the butter onto parchment paper and put it into the freezer while you prepare the remaining ingredients. While the butter is freezing, whisk together the flour, baking powder, baking soda, and salt in a large bowl. Remove the butter from the freezer and use a fork to scrape it off into the flour mixture.
Add the garlic scapes, scallions, and cheese and mix it all together. Pour in the cold buttermilk and stir until mostly combined, but not too much so you don’t overwork the batter. Scoop 6-7 even portions of the batter and place them into a 9-inch pie pan (or 8 or 9-inch square pan) that has been sprayed with nonstick spray.
Thinly slice the butter into 6 pieces and place them on top of the batter. Finally, sprinkle on the salt and bake the biscuits for 15-20 minutes, or until they are fluffy and golden brown. Serve warm.

Freezing Cheesy Garlic Scapes Biscuits
You can freeze biscuits before you bake them or after they have been baked. To freeze the dough, separate the scoops of dough and place them on a parchment-lined baking sheet. Don’t let them touch or they will all freeze together! Cover the biscuits with plastic wrap and let them freeze for a few hours, or until they are completely frozen.
After the dough has frozen, store the biscuits in a sealed, freezer-safe bag (dated and labeled) until you are ready to bake them. I recommend baking them within two months of freezing. You can bake them frozen at the same 450°F temperature, but they may take about five minutes longer.
If you are freezing biscuits after they have been baked, be sure to let them cool completely before freezing them. Wrap each biscuit in aluminum foil and store in a zipped freezer-safe bag or airtight container for up to two months. Again, be sure to date and label the container.

More Bread Recipes


Cheesy Garlic Scapes Biscuits
Ingredients
Biscuits
- 6 tablespoons butter, frozen
- 2 cups (250g) flour
- 1 tablespoon baking powder
- 1 teaspoon baking soda
- 1 teaspoon salt (if you don't like salt, use 1/4 tsp)
- 3 tablespoons garlic scapes, finely diced
- 2 tablespoons scallions, finely diced
- 1 cup cheddar cheese, grated
- 1 cup (245g) buttermilk, cold
Topping
- 2 tablespoons butter
- 1/2 teaspoon sea or kosher salt (if using table salt, use less)
Instructions
- Preheat oven to 450°F and prepare a 9-inch pie pan by spraying it with nonstick spray.
- Grate butter using the fine edge of your grater. Grate onto parchment paper and then place it in the freezer while you prepare the remaining ingredients. (I grab 1 stick of butter, which is 8 tablespoons, and then grate until there are 2 tablespoons left. I use the remaining 2 tablespoons as topping on the biscuits. This method utilizes all your butter and saves your fingers when grating!)
- Add flour, baking powder, baking soda, and salt to a large bowl. Use a whisk to sift ingredients.
- Get grated butter out of the freezer and, using a fork, incorporate into dry ingredients.
- Add the garlic scapes, scallions, and cheese and mix.
- Add in the buttermilk and stir until mostly combined, being careful not to overwork the batter.
- Scoop out 6-7 even portions of the batter and place in the pie pan, one next to the other. (I use my hands, this gets a bit sticky.)
- Cut the two tablespoons of butter into 6 thin slices and top each biscuit with the butter. Sprinkle with salt.
- Bake for 15-20 minutes or until fluffy and golden brown.
- Serve warm with more butter. (optional to add more butter)
Did you make this recipe?
You can tag me at @iamhomesteader.


These were delicious, thank you for posting (and 607 CSA for sharing)