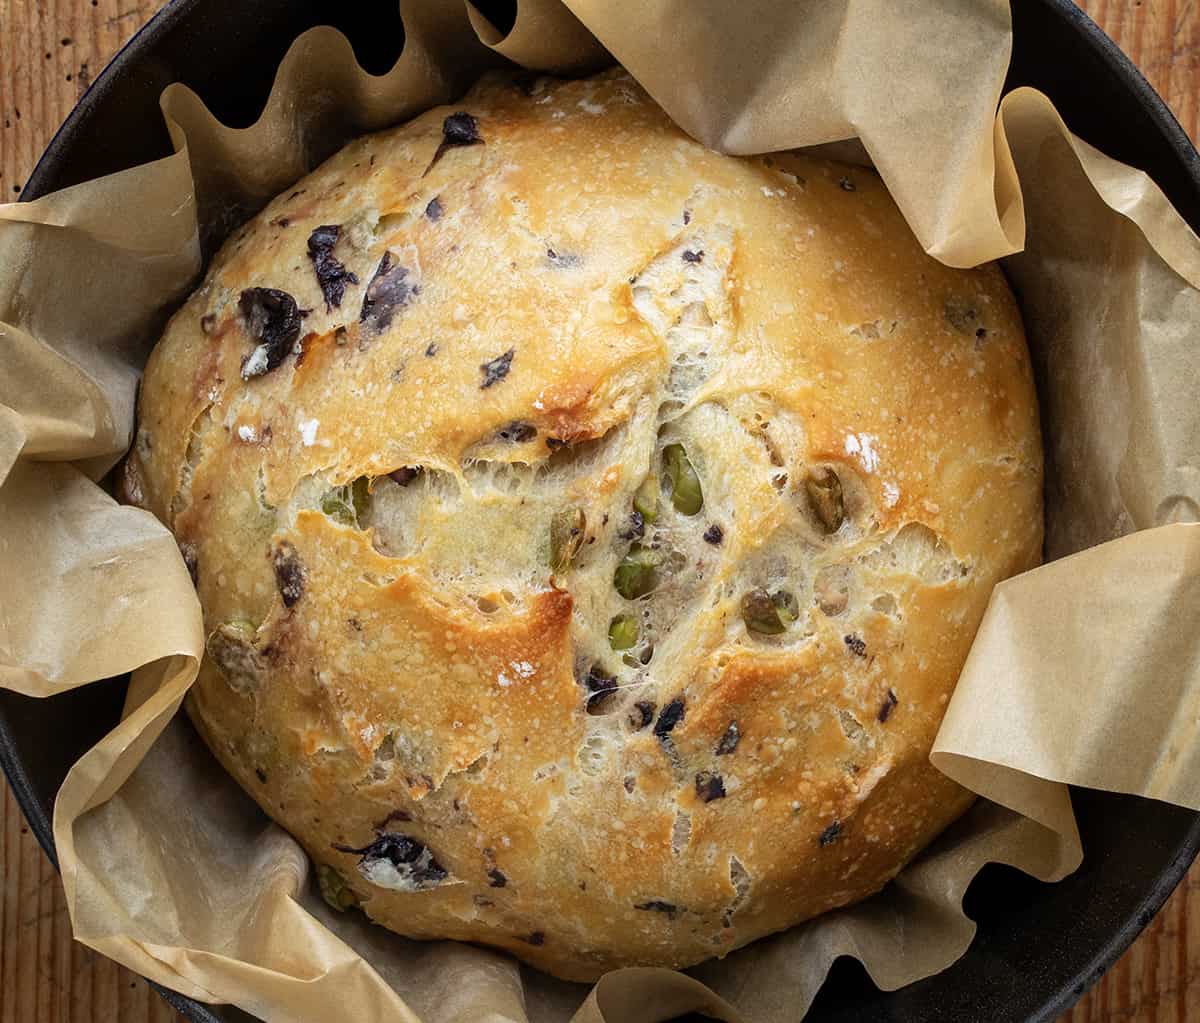
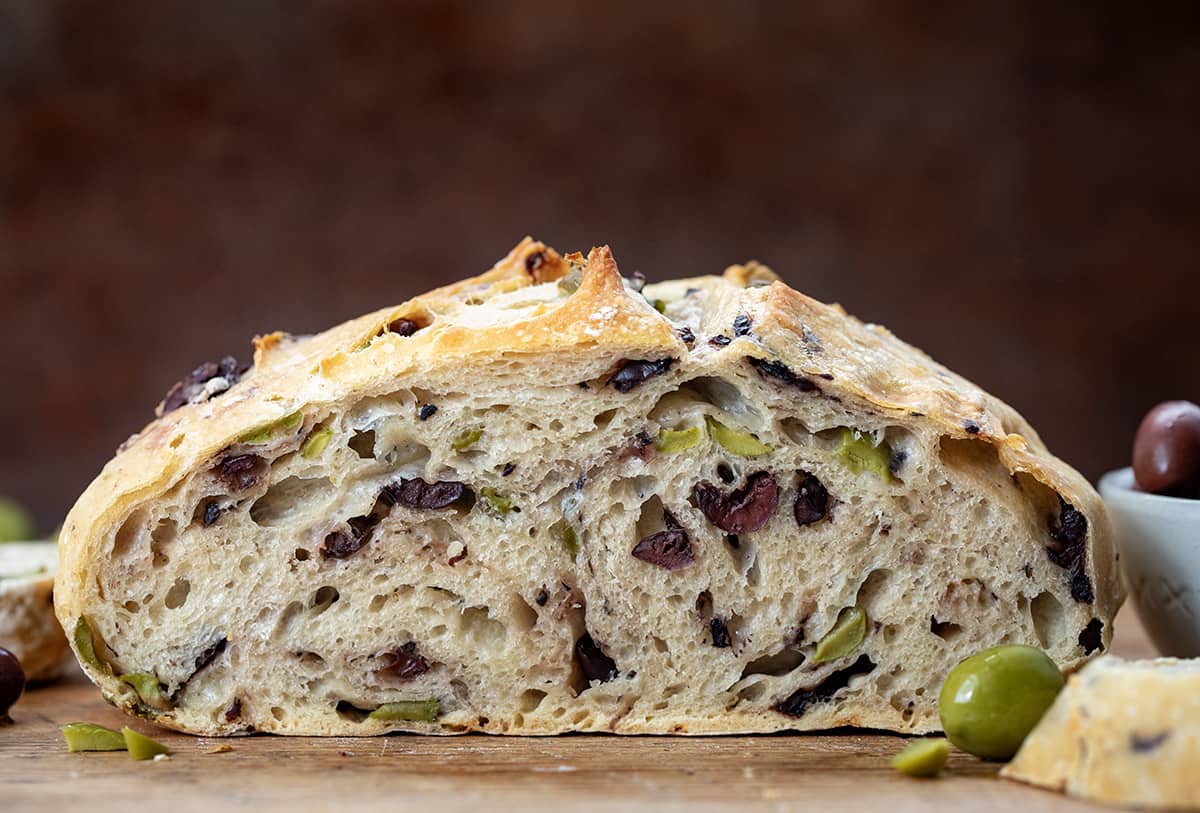
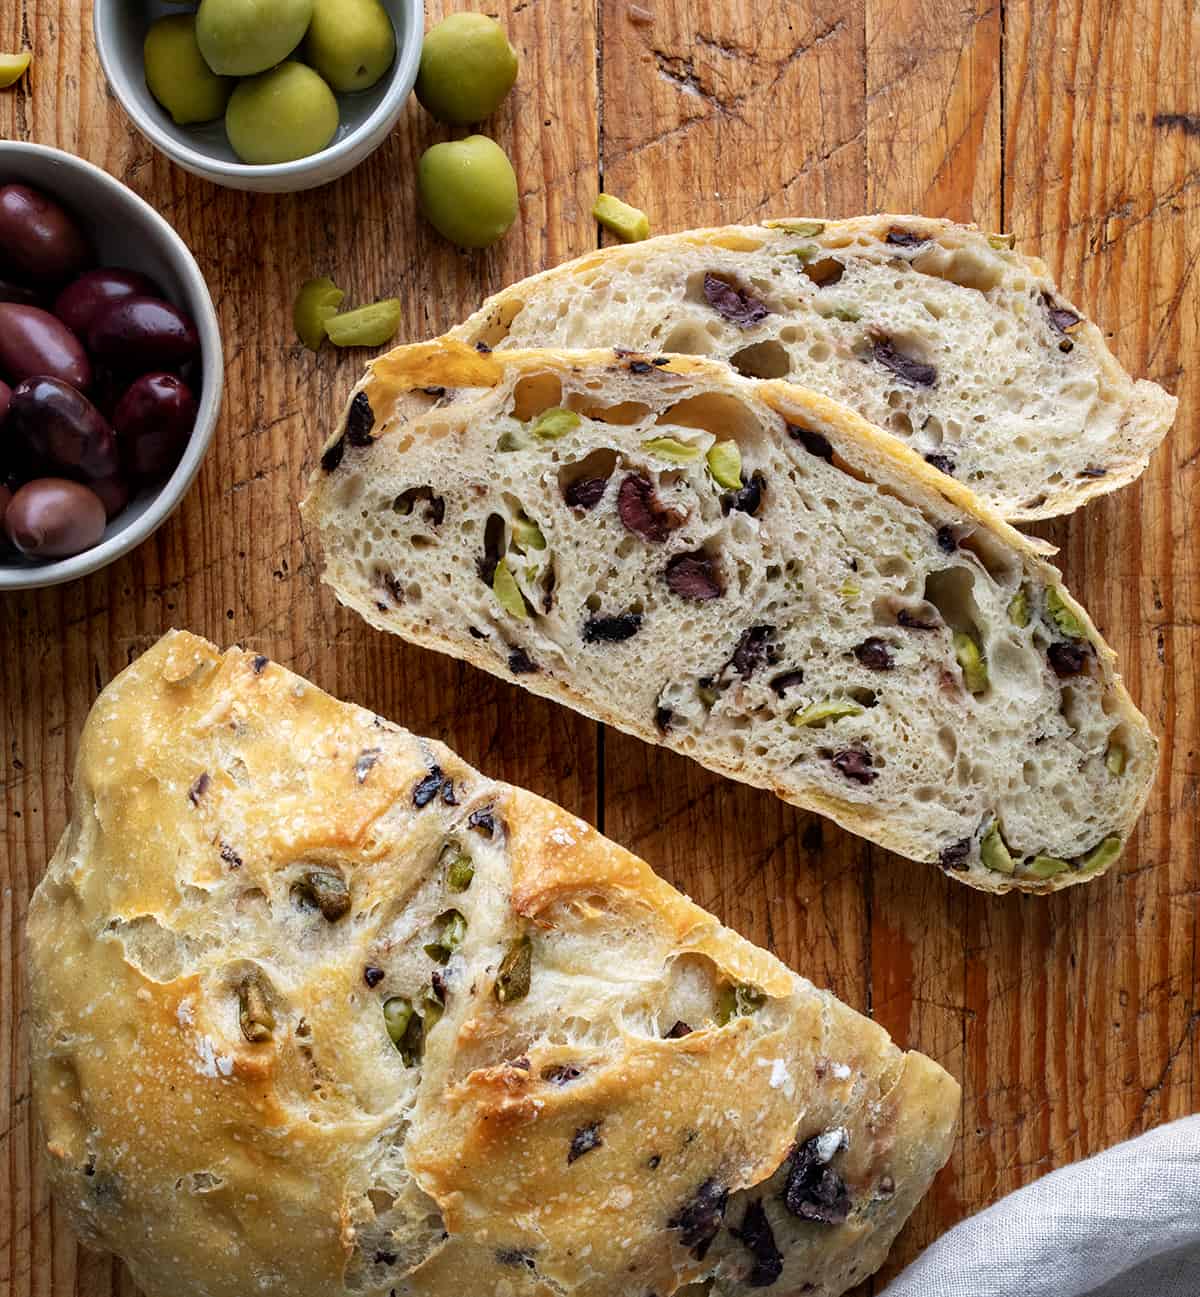
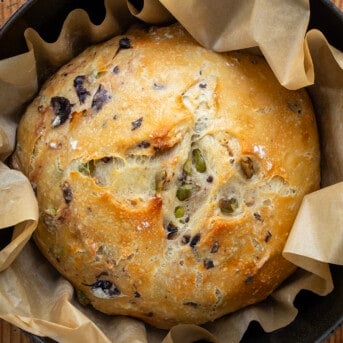
Olive Bread is a savory, artisan-styled bread with a golden crust, two varieties of olives, parmesan, and asiago cheese, with a hint of garlic. Each bite is a delightful combination of textures and flavors, perfect for a variety of occasions! It can be enjoyed with a simple pat of butter, served as a side, or used for a delicious gourmet sandwich! If you love homemade rustic and hearty bread, you will also love my Sun-Dried Tomato Bread!
Ingredients & Substitutions
Flour: You will use 3 cups of all-purpose flour in this recipe. We have not tested this bread with other kinds of flour, so I can’t speak to their effectiveness.
Yeast: This recipe uses rapid-rise yeast, also known as instant yeast. There is no need to wait for rapid-rise yeast to bloom and can simply be mixed with the other dry ingredients. It is different than active dry yeast, which needs to be activated (bloomed) in warm water before use.
Castelvetrano Olives: Castelvetrano olives are a type of green olive known for their mild and approachable flavor. They are less bitter and less intensely briny than other green olives, making them particularly appealing to those who might find traditional green olives too salty or sharp!
Kalamata Olives: Kalamata olives are a type of black olive that ranges in color from dark purple to deep black. They have a fruity, briny, and somewhat tangy taste and are a staple in Mediterranean and Greek dishes.
Cheese: Grated parmesan and asiago cheese are added to the bread. Each of the cheese’s distinct flavors pairs well with the olives.
Do I Have To Let The Dough Rise For 18 Hours?
It is highly recommended to let the Olive bread dough rise for the full 18 hours. Letting it rise at room temperature (no need to refrigerate) for this length of time resulted in a deeper flavor and more bubbles on the crust. The crumb was more like sourdough bread with large holes. If you shorten the rise time to about 3 hours, the crumb may be tighter, and the flavor not quite as developed, but still delicious.
Can I Make Olive Bread Without A Dutch Oven?
Olive bread turns out beautifully when baked in a Dutch oven, which this recipe specifically calls for. The result is a crusty top with a soft inside. But, you can also try using other oven-safe pans like a loaf pan or a springform pan. Or, even shape it into a freeform loaf on a baking sheet. Make sure you also have a lid that’s safe for the oven. Keep in mind that if you use a different pan, you might need to change the baking time, and the bread might turn out a bit differently.
Can I Use Different Kinds Of Olives?
Certainly! You can use different types of olives in the bread if you prefer or if you have specific olives you enjoy. Try the bread with black olives, a Mediterranean mix of olives, or use all of one specific kind of olive you love! That would definitely be a fun and tasty experiment to try!
How to Store Olive Bread
For bread you are going to eat in a few days, store it at room temperature. Here are some tips for storing at room temperature:
- In addition to keeping the bread at room temperature (60°F to 80°F), keep the bread in a darker place, away from sunlight.
- When cutting a slice of bread, first, cut the loaf in half (yes, in the middle and not at the end). Then, when you cut a slice or two, you can put the two halves of bread back together, limiting exposure to a cut end.
- Wrap the loaf in plastic or aluminum foil.
- Enjoy it within 2-3 days. Otherwise, your best bet is to freeze the bread.
Freezing Olive Bread
If you are not planning to enjoy the olive bread within a few days, freeze it! To freeze bread:
- Let the bread cool completely.
- Wrap the loaf (or portion of the loaf) in aluminum foil; then, store it in a sealed plastic bag.
- Place the bread in a colder part of the freezer, away from the door.
When ready to enjoy the bread, remove it from the freezer and unwrap it. Store it in a zipped plastic bag at room temperature. Or, to enjoy the bread right away, remove it from the plastic bag. Then, while still in the foil wrapping, heat it up in the oven for 10-15 minutes at 450°F.
Olive Bread
Ingredients
- 3 cups (375 g) all-purpose flour
- 1 teaspoon kosher salt
- 1 teaspoon rapid-rise yeast
- 1 ½ cups (375 g) water, room temperature
- ½ cup (45 g) Castelvetrano olives, pitted, roughly chopped
- ½ cup (45 g) kalamata olives, pitted, roughly chopped
- ¼ cup (25 g) parmesan cheese, grated
- ¼ cup (25 g) asiago cheese, grated
- 1 teaspoon garlic, minced
Instructions
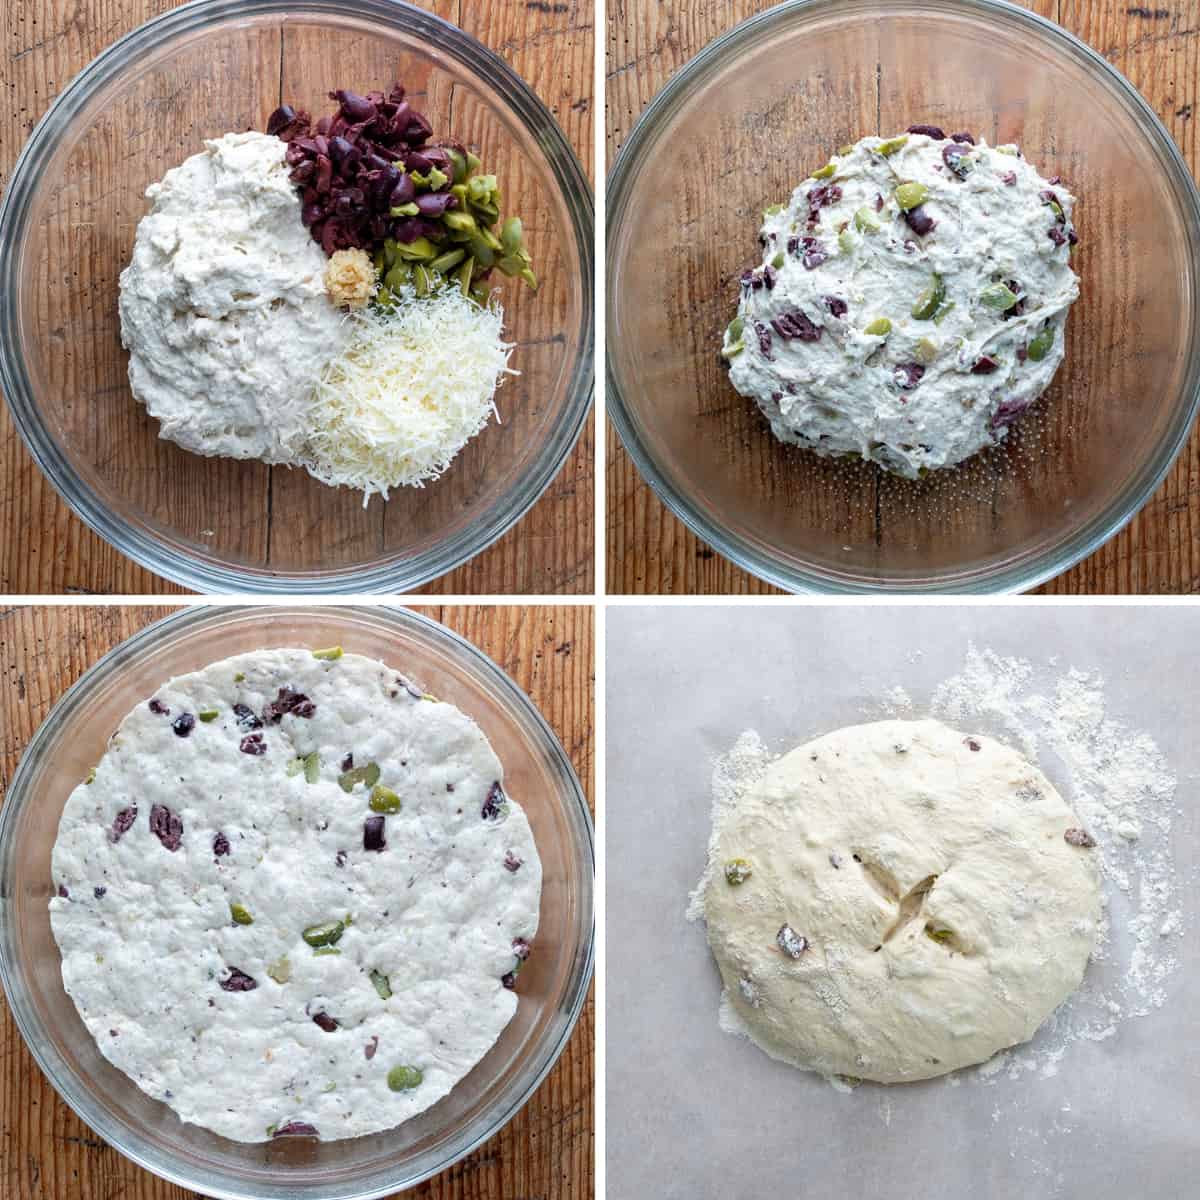
- In a large mixing bowl, combine flour, salt, and yeast. Whisk together until combined.
- Add water and mix until combined.
- Fold in the olives, parmesan, asiago, and garlic.
- Pour the mixture into a clean, greased bowl and cover with plastic.
- Let the dough rise at room temperature for 18 hours. The dough should be doubled in size. (See notes for alternative rising times*.)
- When ready, place the dough onto a floured piece of parchment paper. Shape it into a ball by stretching and folding the dough over. Spray the dough with nonstick cooking spray before covering it with plastic. Let it rest for 30 minutes.
- Using a very sharp knife (like a paring knife or bread lame), score the top of the loaf with an “x”.
- Place a Dutch oven (I used a 4 quart) into a cold oven. Preheat the oven and pot to 450°F.
- Once preheated, carefully transfer the dough with the parchment paper to the hot Dutch oven. Cover and bake for 30 minutes.
- Uncover and continue to bake for 15 minutes, or until golden brown on top.
- Carefully remove the loaf from the Dutch oven and allow to cool for 30 minutes before slicing and serving.
Video
Notes
Did you make this recipe?
You can tag me at @iamhomesteader.
What the Test Kitchen had to say about this recipe:
I have to admit I was a skeptic about this bread. I'm not a huge olive fan so adding it to bread is probably the last thing I would do. However, the olive bread quickly won me over! The flavors blend perfectly! Bonus: This bread is REALLY easy to make!

Elizabeth
I am a fan of some varieties of olives and dislike others, so I wasn't sure about this bread…but, WOW!!!! I love the texture of the bread, and the flavor of the olives (which does shine through) is so good!

Rachael
I love olives so much and this is fantastic in this delicious Dutch oven bread. I would eat this on it's own or even in a sandwich would be fantastic… if it could last that long!

Annabelle
Perfect. That is the only word for this bread. It's crunchy on the outside, soft on the inside, and has the best olive flavor.

Bella
Not only is it a stunning loaf, but this tastes phenomenal. The olives aren't too bitter or sour. They have a little saltiness and a sweet tang that complements the cheeses perfectly. The bread is soft and chewy inside. Worth the time and effort!
I love this bread so much! The sweetness of the olives really shines through and there is just the perfect hint of cheese as well. Try it toasted as well!


This sounds delicious but before I dive in, with the long proofing time wouldn’t the dough be over proofed and go flat?
Hi Patrick! In this recipe, the long rise is intentional. Since it uses a relatively small amount of yeast, the dough can ferment slowly over 18 hours, which helps develop flavor and texture without necessarily becoming over-proofed. The dough should roughly double in size during that time. If your kitchen runs particularly warm, you may find it reaches that point a little sooner. But under normal room-temperature conditions, the long rise is what gives this bread its artisan-style flavor and crumb.
Hope you enjoy it!
Terrible
Why? Flavor? Technique? Please feel free to elaborate this very cryptic comment. It’s not currently providing much value for others.
Can you bake this bread without a Dutch oven?
Hi! Yes, you can definitely bake this without a Dutch oven. A Dutch oven just helps trap steam and create a great crust, but you can still get a beautiful loaf without one.
Just shape your dough as directed and bake it on a preheated baking sheet (or pizza stone if you have one). To help with the crust, place a small pan of hot water on the lower rack of your oven while the bread bakes… the steam does the trick.
Your loaf may look a little different than a Dutch-oven bake, but it will still turn out delicious.
This is a terrific recipe! It’s my first try at going beyond breadmaker bread.
I baked this recipe in the Challenger bread pan I bought yesterday. The only problem with the directions is that the water to flour ratio is way off. For the 375 gms of flour specified in the recipe, I would start with 236 gms (~1 cup) of water (63%). BTW, 3 cups of all purpose flour weighs about 360 gms (according to King Arthur). 1.5 cups of water weighs 347 gms.
My wife’s official rating of the baked result is that this is the best bread she’s ever eaten 🙂
I’ll try a sourdough version next.
Thanks!
I just put my first try at making this bread in the oven. will tell later how it works out.
An absolute keeper♥️♥️😋♥️♥️!! Freakin delicious!!
1:1 flour to water feels like a mistake. (375 grams of each). I upped the flour to 425 grams. Is it a typo?
No, it is not a typo. The measurements are correct and I suspect that if you added 50g your bread was on the dry side?
same here!
Can you leave the stove in the refrigerator overnight to rise?
I made this per the directions, except I needed to add a bit more flour, as the dough was extremely wet and impossibly sticky. While the flavor was good, I found the texture a bit gummy. I’m not sure if I should have baked it longer, or if it was the extra flour I added?
I made this bread 3 times & it is a family fave (and so easy too). I have a question about the water. The first 2 times I measured 1 1/2 cups of water with 2 different results. So the third time I weighed the water, 375 g as stated in the recipe. That was too much water making a very wet dough, which I corrected with a little more flour. Did you possibly mean 375ml which is closer to 1 1/2 cups than 375g is?
I made this bread with bread flour and it came out beautifully. It’s sinfully good!
Can you adapt this to a bread machine?
I am wanting to make this but with Gaelic and 1 kind of olives…I’m not an olive fan but it looks do dang good!
All I have is rapid yeast no instant. Is that ok?
It’s explained in the notes before the recipe.