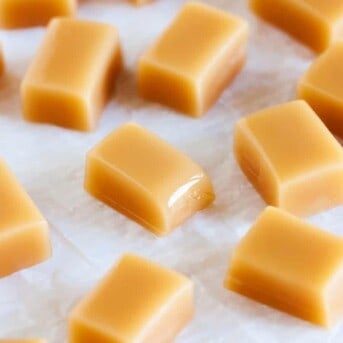
Soft, chewy, and melt in your mouth Amish caramel is the perfect candy to set out for guests or gift giving. With only a few staple ingredients and a little bit of time, homemade candy has never been easier.

Amish Caramel
This candy has been a family staple for as long as I can remember. The sweet, melt in your mouth candy is a time warp. It brings you back every single time. When I tell people that making this Amish Caramel recipe is really not that difficult, I usually get an eye roll or two. It is the truth though, just give it a little time and you will be so happy with the results. It is the perfect simple gift. Throw a few of these in a cute bag and share them with your friends and family!
How to make Caramel Candy
One of the biggest questions I get from people is how to get the perfect soft caramel. It all boils down to (no pun intended) achieving the soft ball stage during the cooking. As sugar syrup is cooked and the temperature rises, the water begins to boil down and the sugar concentration increases. At 240˚ Fahrenheit, the caramels are at the “soft ball” stage. That means if you drop a small bit of the candy into cold water it will form a soft ball. If you don’t have a candy thermometer, this cold water test can be used to see if your candies are ready.
Candy Temperatures
It’s helpful when making candy for the first time to understand how quickly the structure of the candy changes based on the temperature achieved during boiling. The following chart should help you if this is your first time making candy.
Thread Stage
230˚-235˚ -at this stage you will get a syrup consistency possibly something you could pour over ice cream.
Soft-Ball Stage
235˚-240˚ – Dropped into cold water, this will have the consistency of a soft flexible ball. This stage is perfect for caramels or fudge.
Firm- Ball Stage
245˚-250˚ – Dropped into cold water this will have the consistency of a firm but, still slightly flexible ball. This is also a good stage for caramels if you like them a little firmer.
Hard-Ball Stage
250˚-265˚ – Dropped into cold water this will have the consistency of a hard ball. This is a good stage for rock candy or gummies.
Soft-Crack Stage
270˚-290˚ – Bubbles on top will become smaller, thicker and closer together. Most of the moisture has cooked out at this stage. Dropped into cold water, it will solidify into threads that will slightly bend and then break. This is a good stage for saltwater taffy.
Hard-Crack Stage
300˚-310˚ – Dropped into cold water, this will form hard brittle threads that break when bent. This is best for toffee.

Tips, Tricks, and Variations
- Tip: You will need a candy thermometer for this recipe. If you don’t have one, you can order this one on Amazon.
- Trick: Individually wrapping these in wax paper helps to keep the fingers from getting too sticky:)
- Trick: These tend to get a little gooey if you leave them in a hot place. Make sure to store them at a cooler temperature so they don’t melt!
- Variations: Dip these in dark chocolate and cover them in sea salt for an extra special treat!
Amish Caramels
Ingredients
- 1 cup granulated sugar
- ¾ cup corn syrup
- ½ cup unsalted butter
- 1 cup heavy cream
- ½ teaspoon vanilla extract
Instructions
- Grease an 8x8-inch baking pan.
- In a medium saucepan over medium-high heat, add the sugar, corn syrup, butter, and ¼ cup of cream. Bring to a boil, stirring continuously.
- While continuing to stir, add the remaining cream. Insert a candy thermometer and while constantly stirring, bring to the soft ball stage. Around 240°F, the sugar syrup will turn transparent and boil rapidly.
- When it hits 240°F remove caramel from the heat and stir in the vanilla. Pour into the prepared baking pan.
- While still warm, use a toothpick to pop any air bubbles that rise to the top. Allow to cool overnight.
- Use a thin knife or small offset spatula to loosen the caramel block from the pan. Transfer the block to a cutting board and cut into desired size and shape. Wrap individually in wax paper if desired.
Did you make this recipe?
You can tag me at @iamhomesteader.
DID YOU MAKE these Amish Caramels?
I want to hear about it! Take a picture and tag me on Instagram or on Facebook. I would love to see your finished product! Make sure to tag me @iamhomesteader or hashtag #iamhomesteader, or both!
Photography by The PKP Way.


I wanted a hard copy of this, using the print gave me all the comments and ads.
how is the shelf life? I have a caramel recipe that I have made for YEARS that I love. Have always wanted to try a version like this with cream. My recipe can usually sit on the counter for up to 2 weeks (it never lasts that long) before the sugar starts to re-crystallize (it doesn’t affect the taste but it does change the texture). When making for friends/gifts/holidays I start making several months in advance. I cut it and wrap it and throw it in the freezer and it is just as fresh when I pull it out as the day I made it. Was curious about your version and the shelf life
Amanda, your discretion of yourself is wonderful and refreshing. I saw the caramel recipe, and had to check you out. May God ” bless you,indeed.”1Chronicles 4:9-10.
I have to take mine off the heat at 246 or mine get to hard? I put everything in to begin with then stir and bring to 246 if I let them get to 248 sometimes they are to hard, not extremely hard but not soft as these unless I take them off the heat then and pour into 8×8 pan.
Looks good, I’m going to try these…
Great recipe! I lightly sprinkled some flaked salt on the caramels after they cooled. Delicious!
Hi my name is Sharon Morris . I am going to try your recipe it looks easy to make. I hope it turns out ok for me. I love caramel candy I could probably set down And eat this in one sitting by myself with no problem. Thank you for this recipe it looks great I can’t wait to try it out for myself. I noticed after my husband passed away seven months ago after 48 years . I noticed that I’ve been eating candy more than I did I love candy that’s my downfall I can eat candy all day long. I know I do probably eat too much but I have all my life and will to the day I die oh well sorry about this . I think you again for the recipe keep up the good work thank you again Looking forward to some more of your recipes. Keep up !Thank-you!!! Sharon Morris from little rock, ark. thanks again.
Looks yummy I am going to try this.
what kink
what kinds cream? to use mix caramel? coffee cream, whipping cream, 50/50 cream??
Heavy whipping cream!
When recipe calls for “heavy” cream, I believe it means whipping cream.
I just take a screenshot of the recipes
Is there an actual cookbook with all these recipes?
Is this there a cookbook with all these great recipes?
Can’t wait to make these! They look so simple and delicious!
I tried making this, follow the directions, but they turned out hard like a candy instead of soft and chewy. The flavor is good, but I don’t know why they came out hard. Any advice?
You boiled just a little too long. It went to hard ball stage. Try 275-300 degrees next time.
Sometimes candy thermometers can be a little”off” you might need to invest in a new thermometer for recipes like this. One or two degrees can make all the difference in how a recipe turns out.
My favorite recipe calls to separate the cream, butter and vanilla. Bring to a boil then set to the side. Then the sugar and syrup, plus a couple teaspoons of water, heat on medium high heat with a candy thermometer to 310 degrees. Don’t stir during this step, only wash the sugar down with a brush and water. Once it reaches 310, add cream mixture and stir like crazy. The temp will come back down to around 230. Bring back up to 258 degrees and then pour into pan.
If you are not sure just how accurate your thermometer is, use the old water test. When the thermometer reads over 275, drop a small amount of the caramel from a spoon into a dish of cool(not cold) water. If it forms into a ball and is soft and pliable, it’s ready. If it doesn’t form you need to cook it longer, and if the ball is hard like candy, you cooked it too long.
Hi, can i use this amish caramel in making cakes? ????
Can’t get it to print. Says 404 Not Found
I have a notebook for just such times. This recipe is very short. Get a pen and copy into notebook. I only use this notebook for recipes. I also cut recipes off cans, or boxes sometimes and tape these into this notebook. I also list the name of a cookbook I have, Then add the name of recipe I have tried and like, Add the page # and that makes it easy to find later without spending hours going thru a stack of Cookbooks. Do you know how much it cost to print hundreds of recipes then find you don’t like them and throw into garbage. Notebooks are cheaper.
Ida, I love the idea of collecting all your favourites like that. ????
Great idea Ida! This system could really work for me! Thank you for sharing it!
It’s not short when you are writing it.
I do this also
Like you I also have a notebook. I got one with 4 built in dividers and have main course, sweets, Christmas and canning and appetizers. I also made a private fb group for all those recipes you want to try that others share but will never find again and I move those recipes in there ????
Would love to join your group! <3
Please give group name. Would also love to join!
Ditto
I would love to join your group as well.
I would l over to join your fb group
I would like to join. Thank you.
I would love to join too!
I tried that. But notebooks turned into larger notebooks, and then into dozens of notebooks. So instead, now I click the print option on my computer. Then I click “Save as PDF”. Then I put them in sectioned folders on my computer under an overall Recipe Folder that can sit on my desktop. It has folders for any recipe one can think of. When I want to make a recipe, I can either write it out or print it in black ink only. The ones I print out go into the notebooks after I have made them, with my notations as to how they turned out. This saves me lots of space, paper, ink and time writing them all out.
Just highlight what you want to print and copy and paste into word or whatever writing system you use. I use this way all the time to print onto my recipe files.
I always use my phone to look it up screen shot it send to your email then print
Can’t wait to make these.Yummy
This is the most easy and delicious caramel candy. I’ve been looking for such a recipe. I thank you so very . I appreciate it. Will be making this soon. I have 2 weddings coming up in the fall. What a treat these will be.
Would also be wonderful dipped in chocolate!! Yum!!
I’ve made them for a few years at Christmas time dipped in dark chocolate with sea salt , To die for !!!!
Sounds wonderful!
great idea going to try it.
I am looking at this recipe while at work and I just cant wait to get home to make this. 🙂
Gotta try this!
I know this will be good