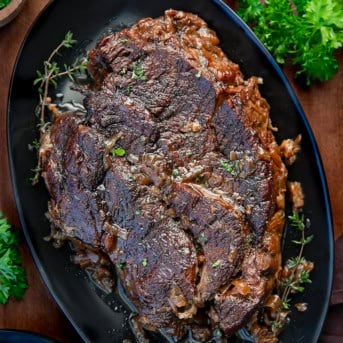
There’s nothing quite like a slow-cooked, fork-tender chuck roast fresh from the oven. This classic oven-braised roast develops rich, savory flavors with minimal effort, perfect for a cozy weeknight dinner or a weekend family meal. Searing the meat first locks in flavor, while cooking low and slow in beef stock, aromatics, and a touch of Worcestershire sauce ensures every bite is melt-in-your-mouth tender. If you love easy, flavorful oven roasts, you’ll also want to check out my Oven Roasted Pulled Pork for another hands-off, tender dinner option.

Ingredients & Substitutions
- Chuck Roast: Look for a 3 to 4-pound chuck roast. It has just the right amount of fat and connective tissue to stay juicy and become tender during slow oven cooking. Season the roast with salt and pepper. You could also use a shoulder roast, which will give similar results. Avoid very lean cuts; they can dry out.
- Olive Oil: Any neutral cooking oil works for searing. Canola, avocado, or vegetable oil are all good alternatives. Olive oil adds a subtle richness.
- Onion & Garlic: Yellow onion and garlic provide a rich, savory base for the roast. You can swap in shallots for a slightly sweeter flavor, or use extra garlic (either smashed cloves or minced) for more punch.
- Beef Broth: I used 1 ½ cups of beef broth to keep the roast moist and create a flavorful braising liquid. You can also use beef stock.
- Worcestershire Sauce: Adds depth and umami. Soy sauce is a good substitute if you don’t have Worcestershire, though the flavor will be slightly different.
- Fresh Thyme: Optional, but it adds a subtle herbal note. Rosemary or a bay leaf can be swapped in if desired.

FAQs
Can I use a different cut of beef?
Yes! Chuck roast is ideal because it becomes tender and flavorful when braised, but you could also use a shoulder roast or even a brisket. Avoid very lean cuts; they can dry out during the long cook.
Do I have to sear the roast first?
Searing isn’t strictly required, but it really helps develop flavor and a rich, brown crust on the outside. If you skip it, the roast will still cook and be tender, but the taste and color won’t be quite as deep.
Can I prepare this ahead of time?
Absolutely. You can season and sear the roast a day ahead, then cover and refrigerate. Bring it to room temperature before braising for the best results.
Can I make this in a slow cooker?
Yes! After searing the roast and cooking the aromatics, transfer everything to a slow cooker. Cook on low for 6 to 8 hours until fork-tender.
Can I freeze leftovers?
Yes. Cool the roast completely, then wrap tightly in plastic wrap and place in a freezer-safe bag or container. Freeze for up to 2 months. Thaw in the refrigerator overnight and reheat gently in the oven.
Can I use minced garlic instead of smashed cloves?
Yes! Minced garlic works fine; add it during the aromatics step. It may cook faster than whole smashed cloves, so keep an eye on it to avoid burning.
How to Know When the Roast Is Done
The roast is done when it’s fork-tender and easily pulls apart. After 3 1/2 to 4 hours of braising at 300°F, the meat should feel soft and give easily when poked with a fork. You can also check using a meat thermometer: the internal temperature should be around 190°F to 200°F for perfectly tender, shreddable meat. If the roast isn’t tender yet, cover it and continue cooking, checking every 20 to 30 minutes until it easily pulls apart.

Serving Ideas
- Classic dinner plate: Serve the tender pulled-apart roast with mashed potatoes (have you tried my roasted garlic mashed potatoes yet?), roasted carrots, and green beans almondine for a comforting, family-friendly meal.
- Sandwiches or sliders: Pile the roast on crusty rolls or slider buns (like Hawaiian rolls) with some pan juices, horseradish, or mustard for an easy weeknight dinner or game-day treat.
- Tacos, burritos, or enchiladas: Shred the roast and use it as a filling for tacos, burritos, or enchiladas. Add your favorite toppings like roasted salsa, cheese, or avocado for a quick twist on dinner.
- Hearty salads or bowls: Use leftover roast over a bed of greens or grain bowls with roasted vegetables and a simple creamy balsamic vinaigrette for a filling, flavorful lunch.
Easy Upgrades
Once you master the classic chuck roast method, it’s easy to switch things up depending on what you’re serving or what you have on hand. Here are a few simple ideas:
- Add Vegetables: Tuck in hearty vegetables like carrots, potatoes, parsnips, or celery before the pot goes into the oven. They’ll braise in the beef broth and become tender and flavorful.
- Add Mushrooms: Sliced baby bellas or cremini mushrooms add earthiness and make the roast feel extra comforting. Stir them in during the last hour of cooking so they don’t overcook.
- Swap the Broth: Beef broth gives the deepest flavor, but vegetable broth works in a pinch, and a splash of red wine with the broth adds richness and acidity.
- Boost the Aromatics: Add extra thyme, rosemary, or bay leaves before braising. Fresh or dried herbs both work.
- Make it Saucy: After braising, strain the cooking liquid and simmer until reduced for a quick pan sauce. Or, pair with homemade Mushroom Shallot Gravy for an even richer finish.
- Brighten it Up: Stir in a tablespoon of red wine vinegar or balsamic vinegar at the end to brighten the flavors, especially if serving with potatoes.

How to Store Chuck Roast
Refrigerator: After cooking, let the roast cool slightly, then store it in an airtight container. The roast and pan juices can be stored together to keep the meat moist. It will stay good for 3 to 4 days. Reheat gently in the oven or microwave before serving.
Freezer: Cool the roast completely, then wrap tightly in plastic wrap and place in a freezer-safe bag or container. You can freeze for up to 2 months. Thaw in the refrigerator overnight and reheat in the oven to maintain flavor and tenderness.
Classic Oven Chuck Roast
Ingredients
- 1 chuck roast, 3 to 4 pounds
- 2 teaspoons kosher salt
- 1 teaspoon black pepper
- 2 tablespoons extra virgin olive oil
- 1 large yellow onion, sliced
- 4 cloves garlic, smashed
- 1 ½ cups (362 g) beef broth, plus more as needed
- 1 tablespoon Worcestershire sauce
- 2 sprigs fresh thyme, optional
For Serving
- mashed potatoes
- mushroom shallot gravy
Instructions
- Remove the chuck roast from the refrigerator and let it sit at room temperature for about 30 minutes.
- Once at room temperature, pat the roast thoroughly dry with paper towels, then season all over with kosher salt and black pepper.
- Preheat the oven to 300°F.
- Heat olive oil in a large Dutch oven or a large pot with a tight-fitting lid over medium-high heat. Once the oil is hot, add the roast and sear for 3 to 4 minutes per side until a deep brown crust forms. Transfer the roast to a plate.
- Reduce heat to medium. Add the sliced onion to the pot and cook for 4 to 5 minutes, scraping up the browned bits from the bottom.
- Add the smashed garlic and cook for 30 seconds.
- Pour in the beef broth and Worcestershire sauce, stirring well to combine. Add the fresh thyme sprigs, if using.
- Return the roast to the pot along with any accumulated juices.
- Check the liquid level; it should come about halfway up the sides of the roast. If needed, add a bit more beef stock to reach that level.
- Cover with a tight-fitting lid and transfer to the oven. Cook for 3 ½ to 4 hours, flipping the roast once halfway through, until fork-tender and easily pulled apart.
- Remove the roast from the oven and let it rest, uncovered, for 10 to 15 minutes. Then, remove the roast from the pan, and gently pull it apart.
- Serve warm with mashed potatoes and mushroom shallot gravy.
Video
Did you make this recipe?
You can tag me at @iamhomesteader.
What the Test Kitchen had to say about this recipe:
Wow, this roast is so tender. It pulled apart so easily and tasted so rich and delicious! Plus, it is super easy to make.

Elizabeth
I am a meat and potatoes kind of gal, and this roast is so good! I love this recipe.

Stephanie
This roast came out soft and flavorful. I will be making this at home a lot!

Bella
Easy to follow recipe. The roast stayed juicy, and the pan juices were delicious on mashed potatoes. Perfect for Sunday dinner.

This was delicious! It was tender, juicy, and the juices left over made fabulous gravy for the mashed potatoes! Definitely will make again!
Can you use a bottom round roast for this recipe?
Hi Rhonda! Yes, you can use a bottom round roast for this recipe. Just know that bottom round is a leaner cut than chuck roast, so it won’t be quite as tender or juicy. I’d recommend cooking it low and slow just like the recipe directs, and making sure there’s plenty of liquid in the pan to help keep it moist. If you have the option, chuck roast will give the best results, but bottom round will still work.
This was delicious, my husband loved it & said this is a keeper! Thanks❤️
Would it taste as good in crock pot? What adjustments should be made.